Recent post a great way to make your blog visitor and readers find topics that are published recently by you.
In order to get your recent blog post with default Latest Post Widget, this can be put together to your latest entries sorted by category or label.
So, follow these simple steps and you will be able to show your latest post for each of your labels or category that you want to display with thumbnails for your blog readers.
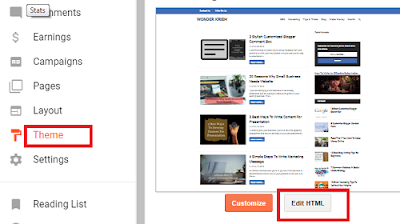
Step 1. Login to your Blogger blog and click on Theme or Template.
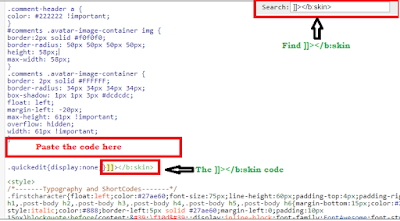
Step 2. Select Edit HTML and by pressing Control + ‘F’ find ]]></b:skin> code.
Step 3. Paste the below CSS style code just above the ]]></b:skin> code.
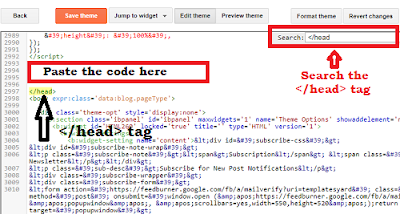
img.label_thumb{ float:left; margin-right:10px !important; height:65px; /* Thumbnail height */ width:65px; /* Thumbnail width */ border: 1px solid #fff; -webkit-border-radius: 10px; -moz-border-radius: 10px; border-radius: 10px; -webkit-box-shadow: 0 1px 1px rgba(0, 0, 0, .4); -moz-box-shadow: 0 1px 1px rgba(0, 0, 0, .4); box-shadow: 0 1px 1px rgba(0, 0, 0, .4); } #label_with_thumbs { float: left; width: 100%; min-height: 70px; margin: 0px 10px 2px 0px; padding: 0; } ul#label_with_thumbs li { padding:8px 0; min-height:65px; margin-bottom:0px; border-bottom: 1px dotted #999999; } #label_with_thumbs li{ list-style: none ; padding-left:0px !important; } #label_with_thumbs a { text-transform: uppercase;} #label_with_thumbs strong {padding-left:0px; } Step 4. Again pressing Control + ‘F’ find the
</head> tag.
</head> tag.
Step 5. Now, paste the below code just above the
</head> tag.<script type='text/javascript'> //<![CDATA[ function labelthumbs(json){document.write('<ul id="label_with_thumbs">');for(var i=0;i<numposts;i++){var entry=json.feed.entry[i];var posttitle=entry.title.$t;var posturl;if(i==json.feed.entry.length)break;for(var k=0;k<entry.link.length;k++){if(entry.link[k].rel=='replies'&&entry.link[k].type=='text/html'){var commenttext=entry.link[k].title;var commenturl=entry.link[k].href;} if(entry.link[k].rel=='alternate'){posturl=entry.link[k].href;break;}}var thumburl;try{thumburl=entry.media$thumbnail.url;}catch(error) {s=entry.content.$t;a=s.indexOf("<img");b=s.indexOf("src=\"",a);c=s.indexOf("\"",b+5);d=s.substr(b+5,c-b-5);if((a!=-1)&&(b!=-1)&&(c!=-1)&&(d!="")){thumburl=d;}else thumburl='https://blogger.googleusercontent.com/img/b/R29vZ2xl/AVvXsEgPFi8Ez0sWnNEUzUIyIdDis09ksFALcv3vE_Xq2IBg76PPK-NhcZ2zPeCneN_1H1eSZQ9zd7KtQ4uOYALs-a7eQOz5w9Vt1dHZdyAGLofOtGiFC6TMnmjBonkgj9t09-tLdKFuaqC33W8/s1600/picture_not_available.png';} var postdate=entry.published.$t;var cdyear=postdate.substring(0,4);var cdmonth=postdate.substring(5,7);var cdday=postdate.substring(8,10);var monthnames=new Array();monthnames[1]="Jan";monthnames[2]="Feb";monthnames[3]="Mar";monthnames[4]="Apr";monthnames[5]="May";monthnames[6]="June";monthnames[7]="July";monthnames[8]="Aug";monthnames[9]="Sept";monthnames[10]="Oct";monthnames[11]="Nov";monthnames[12]="Dec";document.write('<li class="clearfix">');if(showpostthumbnails==true) document.write('<a href="'+posturl+'" sasaran ="_top"><img class="label_thumb" src="'+thumburl+'"/></a>');document.write('<strong><a href="'+posturl+'" sasaran ="_top">'+posttitle+'</a></strong><br>');if("content"in entry){var postcontent=entry.content.$t;} else if("summary"in entry){var postcontent=entry.summary.$t;} else var postcontent="";var re=/<\S[^>]*>/g;postcontent=postcontent.replace(re,"");if(showpostsummary==true){if(postcontent.length<numchars){document.write('');document.write(postcontent);document.write('');} else{document.write('');postcontent=postcontent.substring(0,numchars);var quoteEnd=postcontent.lastIndexOf(" ");postcontent=postcontent.substring(0,quoteEnd);document.write(postcontent+'...');document.write('');}} var towrite='';var flag=0;document.write('<br>');if(showpostdate==true){towrite=towrite+monthnames[parseInt(cdmonth,10)]+'-'+cdday+' - '+cdyear;flag=1;} if(showcommentnum==true) {if(flag==1){towrite=towrite+' | ';} if(commenttext=='1 Comments')commenttext='1 Comment';if(commenttext=='0 Comments')commenttext='No Comments';commenttext='<a href="'+commenturl+'" sasaran ="_top">'+commenttext+'</a>';towrite=towrite+commenttext;flag=1;;} if(displaymore==true) {if(flag==1)towrite=towrite+' | ';towrite=towrite+'<a href="'+posturl+'" class="url" sasaran ="_top">More »</a>';flag=1;;} document.write(towrite);document.write('</li>');if(displayseparator==true) if(i!=(numposts-1)) document.write('');}document.write('</ul>');} //]]> </script>
Note: In order to add your own image, replace the image URL that is highlighted by red color with your own image URL.
Extra shots: To get a better image resolution, find by pressing control + ‘F’ together and add the below script just above the
</body> tag.
</body> tag.
<script type='text/javascript'> function changeThumbSize(id,size){ var blogGadget = document.getElementById(id); var replacement = blogGadget.innerHTML; blogGadget.innerHTML = replacement.replace(/s72-c/g,"s"+size+"-c"); var thumbnails = blogGadget.getElementsByTagName("img"); for(var i=0;i<thumbnails.length;i++){ thumbnails[i].width = size; thumbnails[i].height = size; } } changeThumbSize("label_with_thumbs",210); </script> So far, we have added the CSS style code and the script and now, we have to add the actual magic code to your blogger.
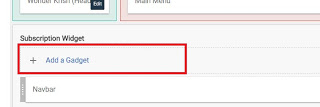
Follow the steps.
<script type='text/javascript'>var numposts = 3;var showpostthumbnails = true;var displaymore = false;var displayseparator = true;var showcommentnum = false;var showpostdate = false;var showpostsummary = true;var numchars = 100;</script> <script type="text/javascript" src="/feeds/posts/default/-/Name-of-the-label?published&alt=json-in-script&callback=labelthumbs"></script> Change the highlighted with red Name of the label with your own label name.
Within the last code, there are some codes which you can make your own customization like you can change from true to false or vice versa.
var numposts ← Number of posts to display var showpostthumbnails ← Show/hide thumbnails var displaymore ← Show or hide the read more link var displayseparator ← Show/hide separator var showcommentnum ← Show/hide the number of comments var showpostdate ← Show/hide the posts dates var showpostsummary ← Show or not the posts summaries var numchars ← Number of posts characters (here you have to change the 100 value) Remember that your Widget will display your latest post only from a particular label that you have added.
Var numposts - Add the number to posts you want to appear in your recent post widget.
Var showpostthumbnails - You can show or hide the images of your post by simply typing true, to show and false, obviously not to show.
Therefore, if you want to display your latest posts from other labels or categories, repeat step 8 to show recent posts from other categories as well.

